 The job started with what was already on the wall. Three acrylic tiles in IonQ's Vista lobby carried old graphics that needed to come off before anything new could go on, and how those old graphics came off would determine whether the acrylic underneath was still usable. Acrylic holds every mark. A scratch from a metal tool, a haze from the wrong solvent, a chemical etch from an aggressive adhesive remover; each one becomes part of the surface permanently, and each one shows through any new graphic mounted on top. North Coast Signs is located in Vista, and we handled this project knowing that the removal stage carried more risk than the installation.
Pulling Old Graphics with Plastic Blades and Acrylic-Safe Solvents
Standard sign removal tools include razor blades, metal scrapers, and general-purpose adhesive dissolvers, and every one of those will damage an acrylic surface on contact. Razor blades leave micro-scratches that catch light and scatter it across the panel face. Metal scrapers gouge channels that fill with dirt over time. Solvent-based adhesive removers designed for glass or metal can craze acrylic, which means the surface develops a web of tiny fractures that cloud the panel from within. We stripped IonQ's existing graphics with plastic-blade scrapers that flex against the surface instead of cutting into it, paired with a solvent rated specifically for acrylic that dissolves adhesive residue without attacking the substrate.
Cleaning in Four Stages Before Any New Graphic Touches the Tile
Residual adhesive left after graphic removal isn't always visible, and invisible contamination causes the same bonding failures as the visible kind. Our cleaning sequence consists of four stages: a solvent wipe to dissolve any remaining adhesive film, an isopropyl alcohol wipe to remove oils and fingerprint residue from handling, a lint-free cloth pass to lift particulates loosened by the liquid steps, and a static-discharge step to neutralize the charge that acrylic builds during cleaning. Each stage targets a different contaminant, and skipping any one of them leaves something on the surface that compromises the bond between the tile and the new graphic.
Calibrating Print Color to the Lobby's Installed Lighting
IonQ's three lobby graphics are full-color digital prints, and full color on paper or screen looks different from full color under the specific light fixtures in a given room. Fluorescent tubes push colors cooler, warm LED panels shift reds and oranges forward, and mixed lighting creates zones where the same print appears to change hue from one end to the other. We print color test strips and evaluate them inside the lobby under the installed fixtures before we commit to the final production run. Reprinting after installation because the blue in the logo reads purple under the client's ceiling lights is a waste of time and material that's avoidable with a fifteen-minute test on site.
Building Clip Templates So Three Tiles Hang Level on the Track
The lobby's existing track system holds 18"x24" acrylic tiles using clips that seat into the rail. Three tiles in a row have to hang at an identical height with consistent gaps between them, and any misalignment between clip positions produces a visible tilt or uneven spacing that the eye catches immediately from across the room. We built physical alignment templates for the clip placement on each tile so every clip seats at the same position relative to the tile edges. The templates remove judgment from the equation; each tile drops into the track and sits level because the clip positions were locked before we ever touched the rail.
Inspecting the Track Before Mounting Anything New
Before we hung a single tile, we inspected the track rails themselves. Rails that are bent, loose at the mounting hardware, or carrying debris from the previous install will throw every tile out of alignment, regardless of how precise the graphic work is. We cleaned the rail channels, tightened the mounting screws, and verified that the track ran level across its full span. That inspection added maybe fifteen minutes to the job, and it prevented every tile from hanging crooked for the life of the install.
Graphics Built for the Room They Hang In
North Coast Signs in Vista produced IonQ's lobby graphics with acrylic-safe removal, four-stage surface prep, color calibration under the installed lighting, and template-locked clip alignment on the existing track. If your Vista office lobby needs updated graphics on acrylic panels and you can't afford scratches, color shifts, or crooked tiles, call (760) 536-5454 and we'll start by inspecting what's already on the wall.
The job started with what was already on the wall. Three acrylic tiles in IonQ's Vista lobby carried old graphics that needed to come off before anything new could go on, and how those old graphics came off would determine whether the acrylic underneath was still usable. Acrylic holds every mark. A scratch from a metal tool, a haze from the wrong solvent, a chemical etch from an aggressive adhesive remover; each one becomes part of the surface permanently, and each one shows through any new graphic mounted on top. North Coast Signs is located in Vista, and we handled this project knowing that the removal stage carried more risk than the installation.
Pulling Old Graphics with Plastic Blades and Acrylic-Safe Solvents
Standard sign removal tools include razor blades, metal scrapers, and general-purpose adhesive dissolvers, and every one of those will damage an acrylic surface on contact. Razor blades leave micro-scratches that catch light and scatter it across the panel face. Metal scrapers gouge channels that fill with dirt over time. Solvent-based adhesive removers designed for glass or metal can craze acrylic, which means the surface develops a web of tiny fractures that cloud the panel from within. We stripped IonQ's existing graphics with plastic-blade scrapers that flex against the surface instead of cutting into it, paired with a solvent rated specifically for acrylic that dissolves adhesive residue without attacking the substrate.
Cleaning in Four Stages Before Any New Graphic Touches the Tile
Residual adhesive left after graphic removal isn't always visible, and invisible contamination causes the same bonding failures as the visible kind. Our cleaning sequence consists of four stages: a solvent wipe to dissolve any remaining adhesive film, an isopropyl alcohol wipe to remove oils and fingerprint residue from handling, a lint-free cloth pass to lift particulates loosened by the liquid steps, and a static-discharge step to neutralize the charge that acrylic builds during cleaning. Each stage targets a different contaminant, and skipping any one of them leaves something on the surface that compromises the bond between the tile and the new graphic.
Calibrating Print Color to the Lobby's Installed Lighting
IonQ's three lobby graphics are full-color digital prints, and full color on paper or screen looks different from full color under the specific light fixtures in a given room. Fluorescent tubes push colors cooler, warm LED panels shift reds and oranges forward, and mixed lighting creates zones where the same print appears to change hue from one end to the other. We print color test strips and evaluate them inside the lobby under the installed fixtures before we commit to the final production run. Reprinting after installation because the blue in the logo reads purple under the client's ceiling lights is a waste of time and material that's avoidable with a fifteen-minute test on site.
Building Clip Templates So Three Tiles Hang Level on the Track
The lobby's existing track system holds 18"x24" acrylic tiles using clips that seat into the rail. Three tiles in a row have to hang at an identical height with consistent gaps between them, and any misalignment between clip positions produces a visible tilt or uneven spacing that the eye catches immediately from across the room. We built physical alignment templates for the clip placement on each tile so every clip seats at the same position relative to the tile edges. The templates remove judgment from the equation; each tile drops into the track and sits level because the clip positions were locked before we ever touched the rail.
Inspecting the Track Before Mounting Anything New
Before we hung a single tile, we inspected the track rails themselves. Rails that are bent, loose at the mounting hardware, or carrying debris from the previous install will throw every tile out of alignment, regardless of how precise the graphic work is. We cleaned the rail channels, tightened the mounting screws, and verified that the track ran level across its full span. That inspection added maybe fifteen minutes to the job, and it prevented every tile from hanging crooked for the life of the install.
Graphics Built for the Room They Hang In
North Coast Signs in Vista produced IonQ's lobby graphics with acrylic-safe removal, four-stage surface prep, color calibration under the installed lighting, and template-locked clip alignment on the existing track. If your Vista office lobby needs updated graphics on acrylic panels and you can't afford scratches, color shifts, or crooked tiles, call (760) 536-5454 and we'll start by inspecting what's already on the wall.
Vista, CA - Custom Signs for Quantum Computing Company IonQ Lobby Graphics
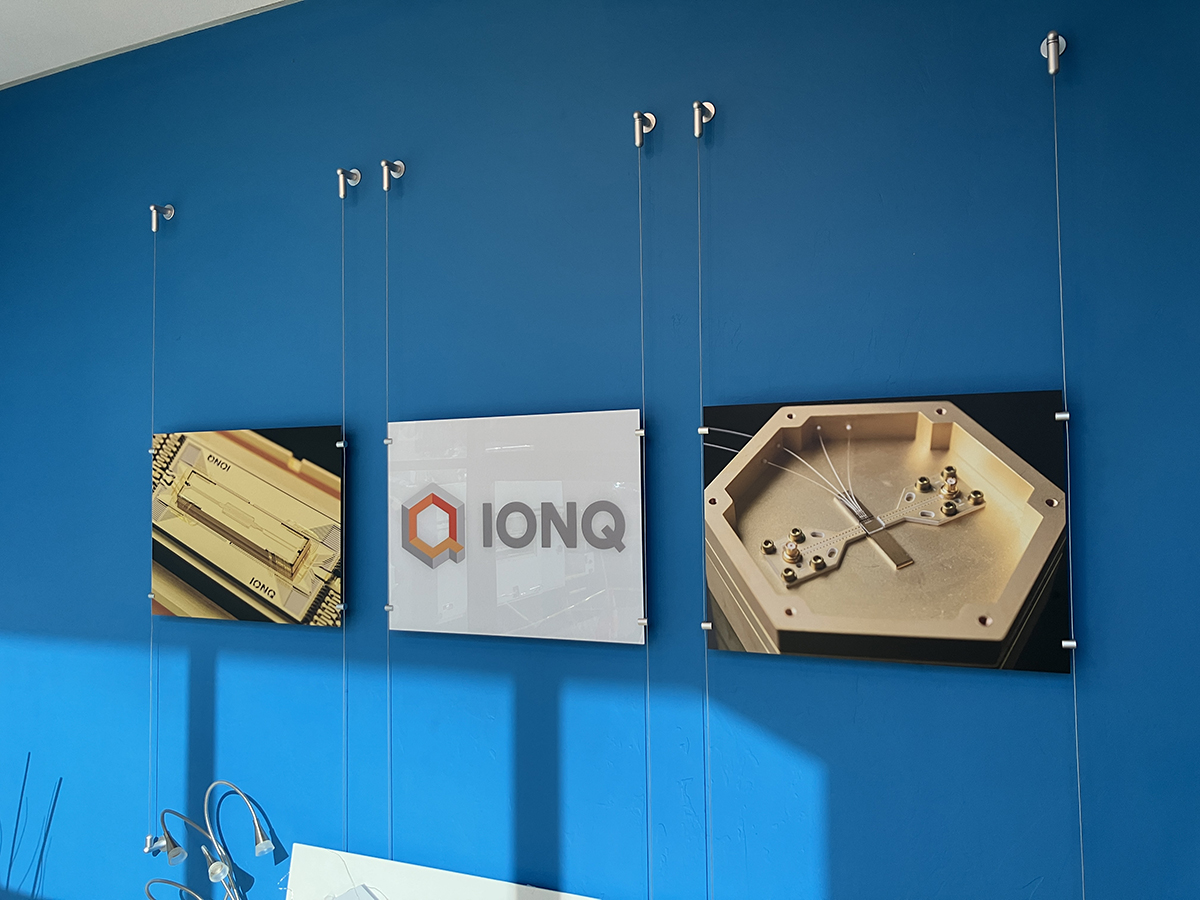
SYNOPSIS: North Coast Signs in Vista produced and installed three custom-printed, laminated, full-color lobby graphics on existing acrylic panel tiles for quantum computing company IonQ.
How We Made Lobby Graphics for IonQ in Vista
BY: ,
The job started with what was already on the wall. Three acrylic tiles in IonQ's Vista lobby carried old graphics that needed to come off before anything new could go on, and how those old graphics came off would determine whether the acrylic underneath was still usable. Acrylic holds every mark. A scratch from a metal tool, a haze from the wrong solvent, a chemical etch from an aggressive adhesive remover; each one becomes part of the surface permanently, and each one shows through any new graphic mounted on top. North Coast Signs is located in Vista, and we handled this project knowing that the removal stage carried more risk than the installation.
Pulling Old Graphics with Plastic Blades and Acrylic-Safe Solvents
Standard sign removal tools include razor blades, metal scrapers, and general-purpose adhesive dissolvers, and every one of those will damage an acrylic surface on contact. Razor blades leave micro-scratches that catch light and scatter it across the panel face. Metal scrapers gouge channels that fill with dirt over time. Solvent-based adhesive removers designed for glass or metal can craze acrylic, which means the surface develops a web of tiny fractures that cloud the panel from within. We stripped IonQ's existing graphics with plastic-blade scrapers that flex against the surface instead of cutting into it, paired with a solvent rated specifically for acrylic that dissolves adhesive residue without attacking the substrate.
Cleaning in Four Stages Before Any New Graphic Touches the Tile
Residual adhesive left after graphic removal isn't always visible, and invisible contamination causes the same bonding failures as the visible kind. Our cleaning sequence consists of four stages: a solvent wipe to dissolve any remaining adhesive film, an isopropyl alcohol wipe to remove oils and fingerprint residue from handling, a lint-free cloth pass to lift particulates loosened by the liquid steps, and a static-discharge step to neutralize the charge that acrylic builds during cleaning. Each stage targets a different contaminant, and skipping any one of them leaves something on the surface that compromises the bond between the tile and the new graphic.
Calibrating Print Color to the Lobby's Installed Lighting
IonQ's three lobby graphics are full-color digital prints, and full color on paper or screen looks different from full color under the specific light fixtures in a given room. Fluorescent tubes push colors cooler, warm LED panels shift reds and oranges forward, and mixed lighting creates zones where the same print appears to change hue from one end to the other. We print color test strips and evaluate them inside the lobby under the installed fixtures before we commit to the final production run. Reprinting after installation because the blue in the logo reads purple under the client's ceiling lights is a waste of time and material that's avoidable with a fifteen-minute test on site.
Building Clip Templates So Three Tiles Hang Level on the Track
The lobby's existing track system holds 18"x24" acrylic tiles using clips that seat into the rail. Three tiles in a row have to hang at an identical height with consistent gaps between them, and any misalignment between clip positions produces a visible tilt or uneven spacing that the eye catches immediately from across the room. We built physical alignment templates for the clip placement on each tile so every clip seats at the same position relative to the tile edges. The templates remove judgment from the equation; each tile drops into the track and sits level because the clip positions were locked before we ever touched the rail.
Inspecting the Track Before Mounting Anything New
Before we hung a single tile, we inspected the track rails themselves. Rails that are bent, loose at the mounting hardware, or carrying debris from the previous install will throw every tile out of alignment, regardless of how precise the graphic work is. We cleaned the rail channels, tightened the mounting screws, and verified that the track ran level across its full span. That inspection added maybe fifteen minutes to the job, and it prevented every tile from hanging crooked for the life of the install.
Graphics Built for the Room They Hang In
North Coast Signs in Vista produced IonQ's lobby graphics with acrylic-safe removal, four-stage surface prep, color calibration under the installed lighting, and template-locked clip alignment on the existing track. If your Vista office lobby needs updated graphics on acrylic panels and you can't afford scratches, color shifts, or crooked tiles, call (760) 536-5454 and we'll start by inspecting what's already on the wall.