Thank you for tuning in to our continuing episodes of “Adventures in Detailing”!
Today we are continuing on from our previous articles on Where paint chips come from, Can anything be done to avoid them & protect your car’s finish, & Is it important to fix them?
So, changing tenses here. Now I know where they came from, but what can I do about them?
First, let’s make sure we have our terms defined.
- A paint “chip†is where the paint has been visibly removed from your vehicle. You can (if big enough) place a fingernail within the chip & feel the difference in height where the paint is missing. They are often about 5mm or less, except in the case of door edges. Especially if the vehicle is often parked next to a rock, brick, or cement wall.
- A paint “scuff†or scrape is larger & will be covered under a future episode.
The most economical way to take care of a paint chip is through “paint chip repairâ€(PCR). If cost is never an option for you, then make good friends with the best body shop technician you can find, but for most of us “regular guys†who are trying hard to watch every dollar & often still wonder where all our money went at the end of the month PCR is your best option.
For the do-it-yourselfers: (please only try this on your vehicle or with the owners permission. If not, take it to a professional.)
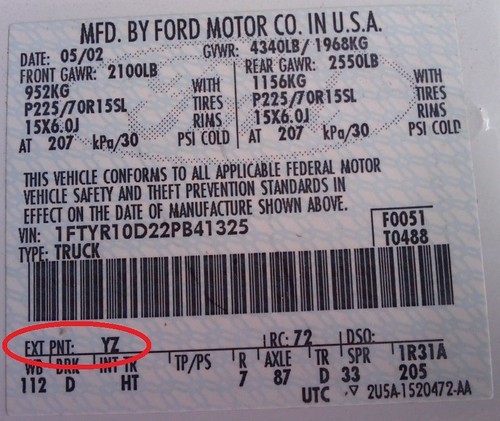
- The first thing to do is locate your manufacturer’s label. For most newer vehicles, this will be located on your driver’s side door jamb. If not there, it may be under the hood, in the glove box, or in the trunk. If you don’t see it fairly quickly, you can check your owner’s manual for its location or call the dealership with your VIN# & they will be able to help you out (they will likely know the paint code & if not, should be able to direct you to the manufacturer’s label).
- The paint code is usually a 2, 3, 4, or even 5 digit combination of letter &/or numbers often (but not always) following or under the letter PC, EXT or Color.
- Below is a manufacturer’s label for a Ford Truck. The Exterior Paint Code is YZ.
____________________________________________________________________________________________
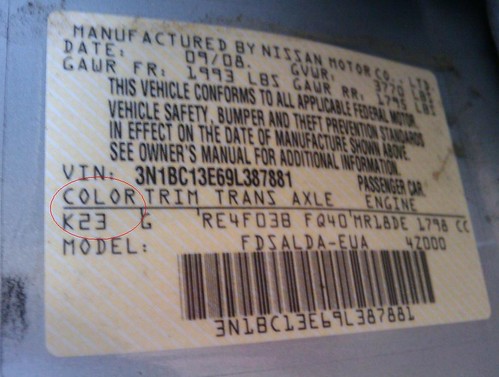
- This Manufacturer’s Label is for a Nissan Versa. The Paint Code is K23.
____________________________________________________________________________________________
- Second, see if your local Walmart or auto parts store has the touch-up paint in stock. If not, you may have to get it from your dealership.
- Like most detailing functions, it is probably best for you to perform PCR out of direct sunlight.
- Now that you have the paint, clean the area of the chip. This is best done with a wax & grease remover if you have it, but if not just make sure the area is clean & thoroughly dry before you get started. DO NOT clean with a silicone or waxy substance, or your touch-up paint will have difficulty holding to the surface.
- If the metal in the chip is rusted, it’s important to grind out the rust first. This is best done with a DremmelTM or similar tool (though a rust eraser will be okay for the exposed metal) & you may have to widen the chip, especially if you see little cobweb like “spider legs†of rust radiating out from the chip under the paint. Unfortunately, this is going to make the chip larger & look worse, but the main goal is to retard rust from continuing to spread under the paint of your vehicle.
- Shake the touch-up paint for at least 60 seconds (more if it’s old) to make sure it is completely mixed. This is important for all colors, but especially so for metallics & pearl tones. Even if you are able to get all of the residue within your touch-up paint fully mixed, it’s still possible that your touch-up paint will not provide an exact match. Under any paint code, there may be a number of alternate formulas listed which will be slightly different from yours.
- Apply the paint to the chip with either a paint stick or dauber, or a very fine soft paint brush.
- The rollerballs that are often included with the touch-up paint are often good for paint-chip application (if you have removed the little {usually orange} insert, press the tip down lightly in the chip & the paint will begin to seep out); the brushes that are included are often good for door, hood & bottom edges (a QtipTM may also be used).
- If your touch-up paint has become old, hardened or goopy, you can try thinning it with a couple of drops of color reducer, though for most of you who don’t have color reducer or thinner lying around, it might be best to just get another tube of touch-up paint. You should put some of the goopy paint in a plastic bottle top & then add a couple drops of the reducer. Adding it directly to the touch-up paint will cause the rest of your paint to harden, making it virtually unusable for future use.
- For many of you, this will be good enough. For those of you who want to try to make it look better, however, here are a couple more steps you can try.
- Get a plastic straight edge (maybe a plastic razor blade scraper or old credit card), a soft rubber straight edge, some color reducer (optional, unless your paint is old, hardened or goopy), & most importantly, some excess paint remover.
- If your chip is on a flat surface, like your hood. Add a drop or two of reducer to the paint in your mixing cap & mix it well. (It should be thin & runny like the consistency of water.)
- Fill the chip so that it is level. Try to contain all of the paint within the chip. If you succeed in this, allow to dry…& you are done. If not, allow to dry, then wipe over with the excess paint remover & a microfiber cloth until the top layer resoftens. Scrape lightly with your plastic straight edge (*** see below) to remove the excess paint. Alternate between wiping with the excess paint remover & the straight edge until the excess is removed.
- If the chip is on a flat surface perpendicular to the ground, like a side panel; do not overly reduce (not too runny). Fill as above. It’s okay to have a little blob or bubble (paint not air) effect & a bit of overrun around the edges when you start out. Let dry & remove as above.
- ***IF YOU HAVE A DARK COLORED VEHICLE. A dark vehicle will show scratches much more easily. If you have a dark colored car, you might want to forgo the plastic straight edge. Instead do it this way.
- Fill the chip so it is level. If necessary, immediately wipe over with your soft rubber straight edge, spreading the excess in a thin layer over the surface of your vehicle (DO NOT do this if you don’t have excess paint remover). Allow to dry. Then wipe over with the excess paint remover & microfiber cloth until the excess paint is gone.
- If you remove too much of the paint, don’t worry about it, just do the process over again.
- Another option for the budget conscious perfectionist:
- Get some clear touch-up paint as well as your base color.
- Apply the base(color) first as above, not filling the chip all the way level, or immediately after applying, wipe over the area with a soft rubber straight edge (this usually removes a small amount from the chip. again, DO NOT do this if you don’t have excess paint remover). Allow to dry (10 minutes is good in most situations, some paints may take longer).
- Apply the clear coat with a new or cleaned & dried applicator. Allow to dry.
- Get a plastic straight edge (maybe a plastic razor blade scraper or old credit card), a soft rubber straight edge, some color reducer (optional, unless your paint is old, hardened or goopy), & most importantly, some excess paint remover.
Thank you again. Comments, questions & personal experiences are welcomed. Please no language that you wouldn’t want to use around your mother, grandmother, daughter, granddaughter, etc.
Stay tuned next week for another episode of “Adventures in Detailingâ€.